2/18/09

Moving cordwood: don't underestimate the tortoise principle

Joe has been hauling the cordwood from the cutting site to the building site. Via rather small tote sleds, without the help of a snowmobile, horse, or even our Newfie. Why? Here is how our decision process went:

We want to begin the cordwood infilling as soon as possible in the spring. Cool, we thought; we'll order sand and lime and be ready to roll as soon as hard frosts have passed. We'll have to allow time to bring the wood over from the cutting site . . . which will mean driving the truck to the cutting areas where the wood is stacked . . . the access roads to which are not likely to be dry enough to drive over till June . . . aarrrgghhh, another flaw in the plan. Better to get the wood out now, while the ground is frozen and snow-covered.

Our first idea was to get the wood out with a borrowed snowmobile and tote sled. Sounded good, but not a viable option for the landowners, since our snowmobile tracks would very likely have had the effect of quickly incorporating their land into the ITS system and attracting every sled for miles around. We finally decided that we'd try the long slow route of hauling wood out with hand-pulled sleds, one small load at a time. When we made the decision, we figured that we might only get a third of the wood out before spring, but that would still give us a jump on building and Joe had some time this winter.

What we didn't expect was the progress that can be made with slow, steady effort. With a good pair of snowshoes, as well as some much-appreciated help from Isaac, Joe has already moved two-thirds of the cordwood from the cutting site to the building site five miles away---including setting up wood racks inside the Sunnywood frame---with a plastic sled, a homemade wooden sled, and an small pickup. This has been a lesson in the value of incremental but consistent expenditure of energy (and way cheaper than a membership at the gym). We have also learned that low-tech solutions can sometimes be very effective: having done this, Joe doesn't believe that using a snowmobile would have been any faster, or that much easier. It does help that the wood has already been drying for a year, so it is considerably lighter than the first time we handled it.
Loading sleds:


Working against gravity:


Working with gravity!:


To Sunnywood:


Inside to stay good and dry:


2/3/09

"You'll be able to heat this place with a candle"

We tarped (does this qualify us for bailout funds?) Sunnywood for the winter back in November, since the post and beam structure currently has no infilling. Here it is, complete with the nifty tarp door Joe built into the east side. So the silver tarp, on the high side, is facing magnetic south,* more or less: this is where most of the glazing will go. More than one person has said to us, upon hearing the details of our design, (particularly the 18-inch-thick cordwood walls), "You'll be able to heat the place with a candle!" Well, we have been inside the house when it was slightly above zero and extremely windy, but sunny. And even with only tarps for walls, it was comfortable enough inside to shed gloves, hats, and an outer layer or two, and eat lunch comfortably. (And also cheerfully bright!) So when I think about adding 18 inches of cordword, mortar, and sawdust insulation, I think maybe those people were right. It appears that our siting and orientation will prove very effective. I also think the earth berm that Nick-the-excavator decided to build behind the house, on the north side, was a wonderful idea. It helps block the north wind tumbling down the slope. There's this wonderful little microclimate around the house, in part because of the berm.

*Wrong: we actually corrected for the magnetic declination and so used "true south." Thanks to my good friend Steve for questioning me on this.

1/10/09

Timber framing: how and why

We were so busy during the fall that we didn't have time to post pictures and explanations of the finer details of the Sunnywood design. As we are now stalled in our building process until spring, we will try to remedy that.
The timber framing process we used was modeled after that described by Rob Roy in Timber Framing for the Rest of Us. Roy contends that while timber framing lends itself to the thick walls necessary for many natural/alternative building methods, most books talk about the craft and art of old-fashioned mortise-and-tenon timber framing. However with inexpensive mechanical fasteners such as brackets, plates, and bolts, "regular" (read, "inexperienced") people can build strong timber frame structures.
Cordwood structures don't require a timber frame. But cordwood is a slow, labor-intensive building method. We finally decided that infilling a timber frame with cordwood, as opposed to building a load-bearing cordwood walls, would allow us to get the roof up on top of the timber frame and lay cordwood under its protection as we had time.
Here are photos of some of the very basic hardware we used to build our "everyperson-style" timber frame. Below, our son Isaac uses a plate to join two beams over a post.


Another thing that Rob Roy advised for a low-pitch (1:12) roof like ours, and which we highly recommend, is to shim the rafters over the beams, rather than cut birds mouths into the rafters. The shims are easy, require less precision, and accomplish the same goal, which is to transfer the vertical load straight down onto the beam. Gravity and friction will hold them in place.
Shims under rafters:

12/27/08

Laying the floor joists

Here's a brief update on how I did the floor joists. We decided to do it before laying the walls for a couple of reasons. First, it got the material inside and under the roof, and second, since we also decided not to lay the floor just yet, it gave us a place to stack the lumber for the floor, also inside and under the roof. We decided not to lay the floor in order to keep the floor boards from getting dirty and having mortar dropped on them while we were doing the walls.

As with so many of the segments of this project, I had to decide how to manage the work in ways I could physically handle the materials, since I worked alone most of the time. The house is 40 ' long x 22' wide on the inside with a central grade beam on an 11.5' center. We decided to use 2x6s for the floor joists on 16" centers. This worked out to one joist nailed to the east and west grade beams on each short side, and 30 joists hung from Timberlock joist hangers between the center grade beam and the long grade beams.

What worked for me was to lay the joists in groups of 6 each. First, I'd measure and mark the 16" centers on the grade beams, then I'd nail in the joist hangers. After the hangers were mounted, I'd measure the the length between the centers of each set of two hangers. I did this because with the rough cut hemlock grade beams there were slight bows and slight differences in the actual widths of the grade beams. Once I had a set of six measurements, I'd cut the floor joists to length. Then I'd mount them in the hangers, check to make sure they were level across the span, and with the joists next to them, and finally toenail them in. I could do about 6 joists in an hour.


The above picture shows the north half of the house with all 32 joists laid. There's not much more to say about this, it's pretty basic stuff.

11/3/08

Cutting the cordwood for the walls

(Joe here.) Obviously, this post is out of sequence for how things really happened. In January of 2007 we began discussing how to get the wood we'd need. We were contemplating buying our wood in tree lengths and then debarking and cutting to size. However, some friends of ours who live near our building site offered to let us cut wood from their land. It was a win-win situation all around, we got the wood for free, they got a lot of cleared space. All they asked was that we haul the brush to central spots so they could chip it.

In June of 2007 we started cutting the wood for our cordwood home. There's really not a lot I can discuss about cutting wood, whole books have been written about it to better effect than I can describe here. I did work out a sequence that worked for me since I was working by myself most days I was cutting wood.

The first thing I'd do is drop the tree, then limb it, and haul the brush. After the site was cleared away and I could see what I was working with, I'd buck it to size, (we are using 18" log ends), making sure to work around forks, bad spots on the trunk, crooks and other less than straight pieces. I'd also save parts of pretty big branches. Depending on how energetic (or tired!!) I was, I'd keep pieces all the way down to a couple of inches in diameter.

After bucking the tree to size, I'd move all the odds and ends of unusable pieces into piles, (some of which we've used in our woodstove), then I'd haul the cordwood to wherever I was going to stack it. Where possible, I tried to set up a stack between two trees in order to have support for the ends of the piles.


I was using a yard cart to move the wood from where I cut it to where I was stacking it. Obviously, the amount I could move depended on what diameter log end I was working with. I had some loads that were only two pieces, some had twenty!! Once I had the wood moved to the pile location, then I'd peel it. There is some discussion about the best way/time to peel the log ends. I tried peeling the entire tree, I tried cutting the trees into 54" sticks (which worked out to three 18" log ends per stick) and peeling those, but ultimately I ended up waiting until I had cut the tree into the 18" log ends. This way I didn't end up peeling forks, crooks and other pieces I wasn't going to use. I also peeled pretty much immediately after I cut the tree as it peeled a whole lot better that way. We used mostly white pine, and some spruce, both of which peeled pretty easily. The spruce was a bit harder because the branches come out in pretty random patterns, the white pine has branches in fairly regular spacing. I was able to peel for up to three days after I cut a tree without having to rely on a drawknife. My typical peeling tool was a putty knife. I could start a slit down the length of the log end and peel the bark away in strips. Sometimes I could get the bark to peel off in one piece, almost like pulling a single sheet off of a roll of paper towels!! One other advantage I found was that, except for the largest pieces, I could sit on a stool with a log end in my lap and peel it. It was nice to be able to work in the shade on hot days!! I was able to peel with no problems from June through about mid-September in our area. After that point I had to start using the drawknife on each piece. As it stands now, I still have about five face cords to peel. Our friends let us stack the wood on their property which saved me having to move all that water in the green wood. By the time we're ready to start the cordwood part of the project, the wood'll be nice and dry, and LIGHT!!

A couple of hints I'll pass on that I hope you'll find useful. I bought a lot of sacrifice clothes at the Good Will thrift shop for this part of the project. You get a lot of sap all over your clothes when you're working with green pine. Also, my friends suggested a pretty neat product called Citri-solv which is a non-toxic non-acidic citrus solution that really takes the sap off of pretty much everything. I used it to clean myself and my tools.

Here is a picture of one of the earlier stacks. Over all, I cut about 8 cords of log ends, which works out to about 21 face cords, which, if I calculated correctly should be enough to do the house we've designed.

Laying down the roof

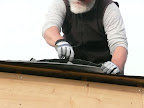
(Joe here.) We laid the roof down in several stages. The first step was the plywood sheathing. Prior to that much care was taken to make sure that the two outermost rafters were square when laying up the rafters. Nick Jose, who did the excavation work, used his bucket excavator to help me lift all 45 sheets of plywood up onto the roof so I didn't have to get them up there one at a time manually. If you're in a situation like I was where I was working alone a lot, that kind of mechanical help is worth the money.

Also as Kyle mentioned we had a few sheets of plywood where I had to either trim off a half inch or so or add a sister to the rafter to ensure the end of the plywood would have something to tie to. Mea culpa. I did not take the time to make sure to straighten out any bowed rafters and make sure that the rafters were on 16" centers for their entire length. I ended up having to trim 3 sheets of plywood and put down 4 sisters. Out of 45 sheets of plywood I suppose that wasn't too bad.

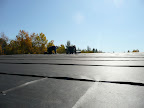
The second step was to tarp the roof due to the immanent arrival of Hannah. Working with two 50 x 24 tarps on a day when a hurricane was blowing in was no picnic. Step three involved waiting for an appropriately windy day to take the tarps off so we could start laying the roofing felt. Step four was to move the sixteen 30' 2" L x 39' W sheets onto the roof. That used muscles I forgot I had!! The day we moved them onto the roof, we only took enough time to tack down each sheet with screws on every other rib, at the top, in the center and at the bottom. Step five was to complete putting in all of the balance of the screws. About 1200 of them. Step six involved finishing up the trim on the sides and the top edge.

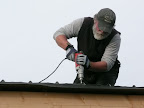
Some comments about working with metal roofing. First, knee pads are your friends, good knee pads are even better. The ones I was using were adequate, but even now, two weeks after I finished my knees are still feeling the after effects. Second, make sure to use a good string line to mark for your screws if having them line up is important to you. Eyeballing a straight line doesn't work all that well. The three rows of screws we put in to tack down the panels wander around a little bit. And last, be careful about trying to use standard products in ways they aren't really designed for. We wanted a shed roof, and there really wasn't a standard product in the manufacturer's catalog that would work for a drip edge on the lower end, and a cover for the ends of the panels at the upper end. I ended up using hip edge which comes with a standard 145 degree angle in it. We needed it to be about an 80 degree angle to line up with the fascia boards. I tried to hand bend it to the correct angle, but ended up putting kinks in the manufactured bend that were difficult to work out when screwing it down to the fascia boards. Plus one piece blew off the roof and bent in the middle and I couldn't quite get that kink out of it. What we've done will work and keep water out from under the panels, but it could look better. What I finally figured out when I was done, was that some sort of bending jig would have been useful.

One very pleasant surprise was that the roof was square to within 1/4 inch on the two diagonals and the metal panels fit just right, without one side being too short or the other being too long.

Oh, and if you're the praying type? You'll get plenty of opportunities to pray while you're on your knees doing roofing.

10/25/08

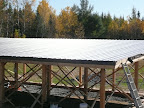
Roof is finished!

Here is a summary of our roofing process (hopefully Joe will add some commentary, as he did most of it). As we said in a previous post, plywood was not the best choice for this rustic, inexact (okay, seat-of-the-pants) building method. But amazingly, when Joe measured the finished subroof, it was exactly the right dimensions, and exactly square. How that happened, we will never know.
We had originally planned to do a sod roof (just as we had originally planned to build a round house). In the end, metal roofing seemed to fulfill more---though definitely not all---of our often conflicting project goals. The advantages include ease and speed of installation, longevity and low maintenance of the material---and the fact that snow might tend to slide off a metal roof far more easily than other materials, even at our low 1:12 pitch. A sod roof, while it would moderate inside temperatures, use greener (so to speak) materials, and help the house blend with its surroundings, would have required us to engineer for a far heavier roof and snow load, and would have taken much longer to install.
Next step was to install fascia boards, eaves, and soffits.
Joe rigged a kind of cantilevered scaffolding out of 2X4s (Brian's idea, I believe?).

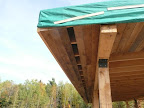
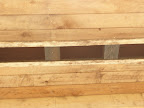
We used rough, bargain-grade hemlock boards for the eaves, leaving a center soffit opening for roof ventilation. Then Joe covered the opening with screening to keep out the varmints.


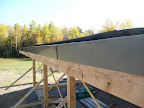
Then came drip edge.
It took some time to dislodge the tarp that we had so securely installed for tropical storm Hannah, and then apply roofing felt.
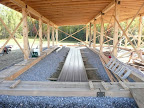
Then, the metal roofing panels arrived. Here they are, stored in what will eventually be bedrooms and part of the shop.

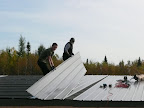
Now to get sixteen 30-foot panels onto the roof. Levers and pulleys would have helped---large mechanized equipment even more. As it was, we fortunately had the power of son Ian to help. Suffice it to say that it took a lot longer---and was far more painful---to get the panels onto the roof than it took to line them up and secure them. It was what you call a character-building experience. Screwing them down seemed easy after that.


The roofing came with these nifty foam inserts to plug up the peaks of the roofing panels.

The metal roofing hangs over the plywood substrate by a couple of inches. This is so gutters can be tucked under the sheathing, so that water will flow directly into them rather than down the fascia boards.