12/27/08

Laying the floor joists

Here's a brief update on how I did the floor joists. We decided to do it before laying the walls for a couple of reasons. First, it got the material inside and under the roof, and second, since we also decided not to lay the floor just yet, it gave us a place to stack the lumber for the floor, also inside and under the roof. We decided not to lay the floor in order to keep the floor boards from getting dirty and having mortar dropped on them while we were doing the walls.

As with so many of the segments of this project, I had to decide how to manage the work in ways I could physically handle the materials, since I worked alone most of the time. The house is 40 ' long x 22' wide on the inside with a central grade beam on an 11.5' center. We decided to use 2x6s for the floor joists on 16" centers. This worked out to one joist nailed to the east and west grade beams on each short side, and 30 joists hung from Timberlock joist hangers between the center grade beam and the long grade beams.

What worked for me was to lay the joists in groups of 6 each. First, I'd measure and mark the 16" centers on the grade beams, then I'd nail in the joist hangers. After the hangers were mounted, I'd measure the the length between the centers of each set of two hangers. I did this because with the rough cut hemlock grade beams there were slight bows and slight differences in the actual widths of the grade beams. Once I had a set of six measurements, I'd cut the floor joists to length. Then I'd mount them in the hangers, check to make sure they were level across the span, and with the joists next to them, and finally toenail them in. I could do about 6 joists in an hour.


The above picture shows the north half of the house with all 32 joists laid. There's not much more to say about this, it's pretty basic stuff.

11/3/08

Cutting the cordwood for the walls

(Joe here.) Obviously, this post is out of sequence for how things really happened. In January of 2007 we began discussing how to get the wood we'd need. We were contemplating buying our wood in tree lengths and then debarking and cutting to size. However, some friends of ours who live near our building site offered to let us cut wood from their land. It was a win-win situation all around, we got the wood for free, they got a lot of cleared space. All they asked was that we haul the brush to central spots so they could chip it.

In June of 2007 we started cutting the wood for our cordwood home. There's really not a lot I can discuss about cutting wood, whole books have been written about it to better effect than I can describe here. I did work out a sequence that worked for me since I was working by myself most days I was cutting wood.

The first thing I'd do is drop the tree, then limb it, and haul the brush. After the site was cleared away and I could see what I was working with, I'd buck it to size, (we are using 18" log ends), making sure to work around forks, bad spots on the trunk, crooks and other less than straight pieces. I'd also save parts of pretty big branches. Depending on how energetic (or tired!!) I was, I'd keep pieces all the way down to a couple of inches in diameter.

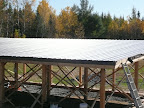
After bucking the tree to size, I'd move all the odds and ends of unusable pieces into piles, (some of which we've used in our woodstove), then I'd haul the cordwood to wherever I was going to stack it. Where possible, I tried to set up a stack between two trees in order to have support for the ends of the piles.


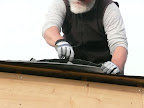
I was using a yard cart to move the wood from where I cut it to where I was stacking it. Obviously, the amount I could move depended on what diameter log end I was working with. I had some loads that were only two pieces, some had twenty!! Once I had the wood moved to the pile location, then I'd peel it. There is some discussion about the best way/time to peel the log ends. I tried peeling the entire tree, I tried cutting the trees into 54" sticks (which worked out to three 18" log ends per stick) and peeling those, but ultimately I ended up waiting until I had cut the tree into the 18" log ends. This way I didn't end up peeling forks, crooks and other pieces I wasn't going to use. I also peeled pretty much immediately after I cut the tree as it peeled a whole lot better that way. We used mostly white pine, and some spruce, both of which peeled pretty easily. The spruce was a bit harder because the branches come out in pretty random patterns, the white pine has branches in fairly regular spacing. I was able to peel for up to three days after I cut a tree without having to rely on a drawknife. My typical peeling tool was a putty knife. I could start a slit down the length of the log end and peel the bark away in strips. Sometimes I could get the bark to peel off in one piece, almost like pulling a single sheet off of a roll of paper towels!! One other advantage I found was that, except for the largest pieces, I could sit on a stool with a log end in my lap and peel it. It was nice to be able to work in the shade on hot days!! I was able to peel with no problems from June through about mid-September in our area. After that point I had to start using the drawknife on each piece. As it stands now, I still have about five face cords to peel. Our friends let us stack the wood on their property which saved me having to move all that water in the green wood. By the time we're ready to start the cordwood part of the project, the wood'll be nice and dry, and LIGHT!!

A couple of hints I'll pass on that I hope you'll find useful. I bought a lot of sacrifice clothes at the Good Will thrift shop for this part of the project. You get a lot of sap all over your clothes when you're working with green pine. Also, my friends suggested a pretty neat product called Citri-solv which is a non-toxic non-acidic citrus solution that really takes the sap off of pretty much everything. I used it to clean myself and my tools.

Here is a picture of one of the earlier stacks. Over all, I cut about 8 cords of log ends, which works out to about 21 face cords, which, if I calculated correctly should be enough to do the house we've designed.

Laying down the roof

(Joe here.) We laid the roof down in several stages. The first step was the plywood sheathing. Prior to that much care was taken to make sure that the two outermost rafters were square when laying up the rafters. Nick Jose, who did the excavation work, used his bucket excavator to help me lift all 45 sheets of plywood up onto the roof so I didn't have to get them up there one at a time manually. If you're in a situation like I was where I was working alone a lot, that kind of mechanical help is worth the money.

Also as Kyle mentioned we had a few sheets of plywood where I had to either trim off a half inch or so or add a sister to the rafter to ensure the end of the plywood would have something to tie to. Mea culpa. I did not take the time to make sure to straighten out any bowed rafters and make sure that the rafters were on 16" centers for their entire length. I ended up having to trim 3 sheets of plywood and put down 4 sisters. Out of 45 sheets of plywood I suppose that wasn't too bad.

The second step was to tarp the roof due to the immanent arrival of Hannah. Working with two 50 x 24 tarps on a day when a hurricane was blowing in was no picnic. Step three involved waiting for an appropriately windy day to take the tarps off so we could start laying the roofing felt. Step four was to move the sixteen 30' 2" L x 39' W sheets onto the roof. That used muscles I forgot I had!! The day we moved them onto the roof, we only took enough time to tack down each sheet with screws on every other rib, at the top, in the center and at the bottom. Step five was to complete putting in all of the balance of the screws. About 1200 of them. Step six involved finishing up the trim on the sides and the top edge.

Some comments about working with metal roofing. First, knee pads are your friends, good knee pads are even better. The ones I was using were adequate, but even now, two weeks after I finished my knees are still feeling the after effects. Second, make sure to use a good string line to mark for your screws if having them line up is important to you. Eyeballing a straight line doesn't work all that well. The three rows of screws we put in to tack down the panels wander around a little bit. And last, be careful about trying to use standard products in ways they aren't really designed for. We wanted a shed roof, and there really wasn't a standard product in the manufacturer's catalog that would work for a drip edge on the lower end, and a cover for the ends of the panels at the upper end. I ended up using hip edge which comes with a standard 145 degree angle in it. We needed it to be about an 80 degree angle to line up with the fascia boards. I tried to hand bend it to the correct angle, but ended up putting kinks in the manufactured bend that were difficult to work out when screwing it down to the fascia boards. Plus one piece blew off the roof and bent in the middle and I couldn't quite get that kink out of it. What we've done will work and keep water out from under the panels, but it could look better. What I finally figured out when I was done, was that some sort of bending jig would have been useful.

One very pleasant surprise was that the roof was square to within 1/4 inch on the two diagonals and the metal panels fit just right, without one side being too short or the other being too long.

Oh, and if you're the praying type? You'll get plenty of opportunities to pray while you're on your knees doing roofing.

10/25/08

Roof is finished!

Here is a summary of our roofing process (hopefully Joe will add some commentary, as he did most of it). As we said in a previous post, plywood was not the best choice for this rustic, inexact (okay, seat-of-the-pants) building method. But amazingly, when Joe measured the finished subroof, it was exactly the right dimensions, and exactly square. How that happened, we will never know.
We had originally planned to do a sod roof (just as we had originally planned to build a round house). In the end, metal roofing seemed to fulfill more---though definitely not all---of our often conflicting project goals. The advantages include ease and speed of installation, longevity and low maintenance of the material---and the fact that snow might tend to slide off a metal roof far more easily than other materials, even at our low 1:12 pitch. A sod roof, while it would moderate inside temperatures, use greener (so to speak) materials, and help the house blend with its surroundings, would have required us to engineer for a far heavier roof and snow load, and would have taken much longer to install.
Next step was to install fascia boards, eaves, and soffits.
Joe rigged a kind of cantilevered scaffolding out of 2X4s (Brian's idea, I believe?).

We used rough, bargain-grade hemlock boards for the eaves, leaving a center soffit opening for roof ventilation. Then Joe covered the opening with screening to keep out the varmints.


Then came drip edge.
It took some time to dislodge the tarp that we had so securely installed for tropical storm Hannah, and then apply roofing felt.
Then, the metal roofing panels arrived. Here they are, stored in what will eventually be bedrooms and part of the shop.

Now to get sixteen 30-foot panels onto the roof. Levers and pulleys would have helped---large mechanized equipment even more. As it was, we fortunately had the power of son Ian to help. Suffice it to say that it took a lot longer---and was far more painful---to get the panels onto the roof than it took to line them up and secure them. It was what you call a character-building experience. Screwing them down seemed easy after that.


The roofing came with these nifty foam inserts to plug up the peaks of the roofing panels.

The metal roofing hangs over the plywood substrate by a couple of inches. This is so gutters can be tucked under the sheathing, so that water will flow directly into them rather than down the fascia boards.

9/6/08

Buttoning up for Hannah

With tropical storm Hannah on the way (which is expected to drop three to five inches of rain) we decided to cover the plywood roof sheathing with tarps until we are able to install metal roofing. Our thought was that tarps would be reasonably fast and easy, and we had other things in our lives to tend to. But it was windy, and the tarps were awkward and required more securing than we thought. As a result it took pretty much all day, and we could perhaps have applied roofing felt and drip edge in this time instead. Live and learn. We also took the time to spread hay on the fresh loam skirting the house and covering the septic, to try to keep it from washing away in the storm.

9/5/08

Finishing off the rubble trench


During the building party, parts of the crushed stone berm, even though it had been compacted, got pushed away from the building by the Feet of the Many. Our foundation contractor, Nick Jose---who has done a wonderful job---tamped more stone in around the berm edges, installed insulation board over the outside of the crushed stone berm as we requested, and then backfilled with topsoil and crushed stone against the grade beam. See how nice and neat it looks?

Plywood Roof Sheathing


We knew that we'd run into surprises---things we hadn't thought through, unexpected aspects, etc. There have been a number of them in the process of roofing. One mistake we made was to try to marry a rough, inexact, forgiving building style to standardized 4' x 8' plywood sheathing. The problem is that the edges of the plywood have to actually have a rafter underneath to nail to. And 4' x 8' is 4' x 8'. Always. But as thoroughly as we (actually more knowledgeable friends who were helping) tried to measure for, mark, and square the rafters, we forgot that the rafters and their measurements were based on a post and beam framework that was cut with a chainsaw.
In some places we have had to sister extra pieces to the rafters. If we were to do this again, we would recommend planking as a sheathing more suited to such an inexact building method.

9/3/08

House Raising!


On Saturday, August 30, a wonderful and eclectic group of family, friends, coworkers, and acquaintances came together to help us raise the timber frame and rafters. What an amazing collection of knowledge, skill, sweat, and generosity!!! Here we have set rebar pins in the grade beam and drilled corresponding holes in the precut posts, and laid them out to be raised.
And as you can see, the house-raising crew took our plans and timbers---and raised the framework for a house!

8/26/08

The Rubble-Trench Foundation

Rubble-trench foundations were used extensively by architect Frank Lloyd Wright in the first half of the 20th century. They have fallen out of favor as concrete has become the norm and many code inspectors are unfamiliar with them. After finally deciding that a concrete slab was unacceptable to us in terms of meeting our project goals (because of extremely high embodied energy, high cost---and hard on feet and legs!), we decided that a rubble trench was time-tested and would provide a fairly simple, low-cost, environmentally friendly alternative. We also decided, after much deliberation, to use wooden grade beams (rot-resistant hemlock) on top of the trench, rather than concrete grade beams. We are betting the long-term soundness of these wooden grade beams on the steps we have taken to ensure that very little water ever touches the beams, that any moisture that comes in contact with them immediately drains away, and that, if for some strange reason water finds its way into the trench, it will not freeze before it drains away. A number of people have tried to persuade us to place a moisture barrier under the hemlock grade beams, but we feel that such a barrier would only serve to trap any moisture that found its way to the beams rather than allowing it to drain away. The following features of the foundation and house should keep the grade beams dry and sound:
> appropriately constructed trench dug all the way to ledge, with raised berm of washed stone and good bottom-of-the-trench drainage
> ground sloped away from the outside of the trench/house
> blueboard insulation angled over outside of trench and backfilled with washed stone
> a 2.5' roof overhang to keep water off the walls and grade beam
> a berm and a swale on the upslope side of the house to direct water away from house
(Excavating and filling the trench, and the graywater septic, is the only part of the construction for which we hired a professional contractor.)

8/25/08

Plan finalized

Our final plan is for a 43' X 25' (40' X 22' interior dimensions), rectilinear house. This is 880 square feet. Take away 176 sq ft for the shop and cold storage, and that leaves 704 sq ft of living space. Modest by today's standards: some would even say that dreaded word, "small" (people who have perhaps never heard of the Small House Society or read The Not So Big House). The skeleton is post and beam (using the methods outlined in Rob Roy's Timber Framing for the Rest of Us), which we will fill in with 18" cordwood infilling. Here is the final model for the post and beam framework. The high side faces south and will hold most of the glazing, and most of the living space. A central cordwood wall will provide thermal mass for the solar radiation thus gained. The low/north side is where the bedrooms and cool storage will be located.


8/24/08

House plan

Rob Roy's arguments about the maximum area of round structures make a lot of sense, and so our first house plan was round. Our second was 16-sided. After receiving foundation bids that nearly equaled our entire building budget, and realizing that a sixteen-sided roof would cost even more, we started over, working from these criteria:
> Simple enough for novices to build
> Passive solar
> Can incorporate standard-sized building materials
> Cheap enough to pay as we go
Most importantly, we reminded ourselves, the house is a means to an end---a different lifestyle---the house isn't the point. It's just a way to come up with a home that's easy/cheap to heat and power, is fairly "green" to build and healthful to live in, and easy/cheap enough to build to avoid debt.
The design elements flowed clearly and easily from these criteria. Our desire to take advantage of the sun and be able to use "off the shelf" building material meant that the house would have to be rectilinear. In order to be simple and cheap, it would also have to be single story. We decided upon a shed roof, since this is the simplest roof to build and lends itself to capturing southern sun. (Passive solar also meant that we couldn't tuck the house under the edge of the woods.) Here are our initial sketches for the resulting plans:


8/23/08

The back story

The influences leading to this building project have been many and varied, coming from our diverse backgrounds: Extension work, back-woods businesses, building boats, gardening, metal working, studying and reenacting history, reading Jack Henstridge and Rob Roy, years of MOFGA's Common Ground Fair, reading James Howard Kunstler , Barbara Kingsolver, and Michael Pollan . . . experiences that, over time, inexorably pointed us in a certain direction. Our growing awareness of the increasing global demands for limited resources such as oil, water, and food finally moved us from thinking to planning. After a long search, we found a piece of land big enough to farm, small enough to pay for, in a community with like-minded people.
One challenge was to figure out how to cut our expenses enough to change our lifestyle (or is it the other way around?)—keeping in mind that one of our four children still needs to be put through college. So we began the process of eliminating debt. If all goes well, we will end up without a mortgage.
The process of self-education has been a fascinating journey. We read a lot of books on alternative building and attended Rob and Jaki Roy's Earthwood building school. A deed restriction prevents us from tying into the electric grid, so we are learning about solar electric and gravity-fed water systems. In researching options for septic systems we stumbled upon Joe Jenkins' brilliant Humanure Handbook. In our search for an environmentally friendly house foundation, we discovered Frank Lloyd Wright's rubble trench concept. We will talk more about all of this later, but right now we have just broken ground and are VERY BUSY!!!