Showing posts with label House design. Show all posts

10/24/09

Remaining cordwood walls uncovered; temporary wall complete

How soon will we be able to move in to Sunnywood? That is the question. As the weather gets colder, the furnace in our rented mobile home runs more and more constantly. The structure doesn't breath, so even with all of the hot air from the forced-air furnace, moisture and mold build up and the air quality is really bad. Quite an incentive to move things along!

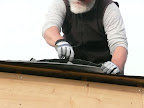
We removed the remaining tarps covering Sunnywood's cordwood walls, as they had been curing for the requisite month. Here is the north-facing wall. The only windows are the egress windows mandated by fire code.


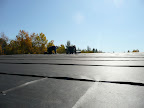
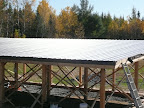
Here are the east and south walls. The south wall has the most glazing of any wall, but is still insufficiently glazed for signficant solar gain.
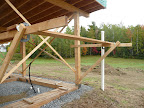
Part of the balancing act we are struggling with concerns the small size of our house, and the fact that we need to maximize productive space. This means making use of wall space for things other than windows.

There remains the possibility that when we complete the last "wing" next year and fill in the last four cordwood panels, the remaining south-facing panel could be filled mostly with glass, making that corner of the greatroom a kind of sunspace. Proper placing of light-colored tile could act as thermal mass to moderate temperatures and reflect light and heat into the rest of the greatroom.
The temporary wall to close us in for winter is complete, except for the installation of the door. We were able to reuse the flakeboard that we'd used as a working surface over the floor joists while we built cordwood. When we build permanent interior walls, we will use wood planking instead, and put the flakeboard in service in an outbuilding, perhaps a wood shed.

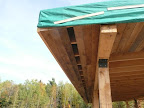
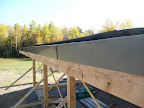
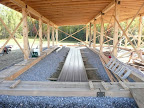
The insulation that we've put in the temporary wall for winter will come in handy somewhere else when this wall comes down in the spring. You can also see the one-inch foam board insulation in the ceiling, which, in addition to the batting and wood above it, gives us about R-38 in the ceilings. Not quite the R-40 to -50 usually advised for passive solar, but close.

10/7/09

Passive-Solar, or Sun-Tempered?

One of our goals in building this house was to be able to live in something easy and inexpensive to heat---an important consideration in Maine. This naturally led us to try to incorporate passive-solar features.

The basic features of passive-solar house design include south-facing orientation, overhangs/shading, thermal mass, sufficient insulation, and energy-efficient windows. Now that the house is coming together, we can see that we have been more successful in incorporating some of these features than others.

We sited the house really well. To take advantage of the sun's heat, a house should be longer than wide, with the long axis east-west, and a long south-facing wall, fitted with lots of window glass situated to absorb the heat from the low winter sun.

Now that the windows are in, we think that we have under-glazed. Since the south wall fronts on a contiguous great-room space that is fairly shallow, we were afraid of overheating, so we were cautious about glazing. We also neglected to consider that the installed windows would actually lose a full two inches in each direction to the frame, so that the actual glass area is 4 inches narrower and 4 inches shorter than we had planned on each window.

On the other hand, we paid really close attention to the angle of the sun and where it hit the south wall in the winter and the summer, and put our glazing high enough to catch the winter sun and avoid most of the summer sun. Our 2.5-foot roof overhangs, also a key passive-solar feature, are integral to making this happen.

Regarding thermal mass: our external walls, with 18 inches of mortar and wood, supply a huge amount of ambient thermal mass. What we are missing is thermal mass specifically located to absorb and moderate the sun's rays. We can still add some in the future, but for now we have decided to forgo extra thermal mass in our internal walls and floors. (We had also decided against a concrete pad foundation, which is a feature of many passive-solar designs.)

Insulation: Our 18" walls contain an average of 8 inches of sawdust insulation. However the value of cordwood lies in the combination of insulation and thermal mass, even more so than in log homes. Nevertheless, I would guess that the insulation alone probably meets the standard for walls, even without considering the mass factor. Our ceiling has standard materials (batts and rigid foam) but at R35, is a somewhat lower R-value than the new super-efficient standards.

Energy-efficient windows: here's where we could have used a bit more education. We thought we had done well, and I was excited at the prospect of new, "Low-e" windows that reduce heat loss through the glass. However, we didn't realize that the windows that were sold to us as energy-efficient were actually "LoE-2" (the "2" is superscripted so you don't really notice it). LoE-2 windows, as it turns out, are manufactured and offered as the "standard" by the major window manufacturers as an attempt to meet the energy efficiency needs of all 50 states. In addition to reducing heat loss through the glass, they also limit solar heat gain by blocking passage of infrared and some ultraviolet rays---a feature helpful in hot-weather climates, but detrimental to a passive-solar design.

So, in the end, our house may end up functioning more as what Dan Chiras terms a "sun-tempered" design than a true passive-solar spacing-heating system. Even so, according to Chiras, a sun-tempered design can take care of 20 to 30 percent of the annual heating load. We'll report back after we've lived there for a while.

9/14/09

Trapped in cordwood

Our long silence does not mean that we've finally mortared ourselves into our walls! We're just in a building frenzy, trying to complete as much wall area as possible before the calendar puts an end to it. After that we'll update this blog with detail and process notes and photos.

We finished the 8th panel on Saturday the 12th. We could move in for the winter with 8 panels, as that would give us three "bays" closed in, if we install a temporary wall at the west end of the completed panels. But we made so much progress on the 9th panel yesterday (we're getting better at this, and faster*), that we are now considering the possibility of a 10th, which would give us 4 bays---all of our living area except the utility and project rooms.

See the rough floor plan below. The gray exterior border represents the 18" cordwood wall. The small black rectangles are posts; there are a total of 14 cordwood panels between the posts. We have completed the panels bracketed with red: three on the north, three on the south, and the two large east panels. As of yesterday, we had about a third of the cordwood done on the 9th panel (the next south-facing panel). If we complete another north panel, making 10, we can move our temporary wall west by an entire set of posts.

We've extended our "stop" date to the 19th, which is surely pushing it in terms of approaching frosts. What do you think: is it worth taking a chance that frost might affect the set of the lime mortar?


*Joe and I, working alone, mixed and laid up six batches of mortar, in addition to cleaning some logs and sifting some sand.

8/20/09

Working on panel 6!

Heidi, beginning the sixth panel:

Our post and beam, shed-roofed, 43' x 25' design has 14 infilled cordwood panels between the posts. The minimum number of filled panels we need to be able to live there during this winter is eight: this would give us the kitchen, bath, one bedroom, and a bit of living area. But we can only lay cordwood until about mid-September, because lime-putty mortar doesn't set up well in really hard frosts. So our goal has been 8 panels by mid-September. Looks pretty doable at this point (maybe we can fill 10 panels, which would give us more living area and the other bedroom!).
The following pictures show the fifth panel, which is actually the center panel of the three well-glazed south-facing living-room panels. This went fast because the window frame took up so much room.
Here are Isaac and Heather, completing the top of the center panel. Note Joe's homemade scaffolding:


Check out Isaac's under-the-window cordwood pattern!


Laying a bottle end:


Joe is sitting in the window well. 18-inch-thick walls make window frames with a lot of options! (You can see one particularly bright turquoise bottle end as well.)

4/23/09

Foundation & drainage design passes winter/spring test!


Swale behind house drains to left/east


Swale designed to catch rain & roof runoff

Berm catches slope runoff on north (back) side

When we were planning the rubble trench foundation and the grading around the house, we were working with good, time-tested ideas (Frank Lloyd Wright and others), but many people were skeptical. One friend was concerned that we weren't tying our grade beams into the bedrock below. Another thought we should insert waterproofing between the grade beams and the crushed stone. Someone else was convinced that since parts of our rubble trench extend only a foot down---where it meets ledge---that our grade beams would heave (below-frost standard is four feet in Maine).

Me, I was concerned that the swale we designed to carry water around and away from the house wasn't deep or wide enough. It looks like a dent---not the ditch I expected. But the ground is graded gently toward the swale, which goes around the side and back of the house and then extends down to the site's natural drainage area.

The snow has melted and we have had our share of spring rains. We took the opportunity presented by the soft spring ground to fine-tune the grading. But it didn't need much: we are pleased to report that the swale scheme, combined with Nick-the-excavator's marvelous berm, worked. The berm, in addition to providing some protection on the north side of the house, stops/diverts water from the north slope before it can reach the house. The swale takes care of water that falls around the house. Our shed-style roof sheds most of the water behind the house, where the gentle swale channels it down the slope to the property's natural drainage.
We are very pleased---okay, pretty damned excited---to see it working so well.

The other design features that are working really well, drainage-wise, are the extended (2.5-foot) roof overhangs and the compacted gravel berm that our grade beams sit on. High and absolutely dry. No water, no frost, no heave, no trapped moisture.

2/3/09

"You'll be able to heat this place with a candle"

We tarped (does this qualify us for bailout funds?) Sunnywood for the winter back in November, since the post and beam structure currently has no infilling. Here it is, complete with the nifty tarp door Joe built into the east side. So the silver tarp, on the high side, is facing magnetic south,* more or less: this is where most of the glazing will go. More than one person has said to us, upon hearing the details of our design, (particularly the 18-inch-thick cordwood walls), "You'll be able to heat the place with a candle!" Well, we have been inside the house when it was slightly above zero and extremely windy, but sunny. And even with only tarps for walls, it was comfortable enough inside to shed gloves, hats, and an outer layer or two, and eat lunch comfortably. (And also cheerfully bright!) So when I think about adding 18 inches of cordword, mortar, and sawdust insulation, I think maybe those people were right. It appears that our siting and orientation will prove very effective. I also think the earth berm that Nick-the-excavator decided to build behind the house, on the north side, was a wonderful idea. It helps block the north wind tumbling down the slope. There's this wonderful little microclimate around the house, in part because of the berm.

*Wrong: we actually corrected for the magnetic declination and so used "true south." Thanks to my good friend Steve for questioning me on this.

10/25/08

Roof is finished!

Here is a summary of our roofing process (hopefully Joe will add some commentary, as he did most of it). As we said in a previous post, plywood was not the best choice for this rustic, inexact (okay, seat-of-the-pants) building method. But amazingly, when Joe measured the finished subroof, it was exactly the right dimensions, and exactly square. How that happened, we will never know.
We had originally planned to do a sod roof (just as we had originally planned to build a round house). In the end, metal roofing seemed to fulfill more---though definitely not all---of our often conflicting project goals. The advantages include ease and speed of installation, longevity and low maintenance of the material---and the fact that snow might tend to slide off a metal roof far more easily than other materials, even at our low 1:12 pitch. A sod roof, while it would moderate inside temperatures, use greener (so to speak) materials, and help the house blend with its surroundings, would have required us to engineer for a far heavier roof and snow load, and would have taken much longer to install.
Next step was to install fascia boards, eaves, and soffits.
Joe rigged a kind of cantilevered scaffolding out of 2X4s (Brian's idea, I believe?).

We used rough, bargain-grade hemlock boards for the eaves, leaving a center soffit opening for roof ventilation. Then Joe covered the opening with screening to keep out the varmints.


Then came drip edge.
It took some time to dislodge the tarp that we had so securely installed for tropical storm Hannah, and then apply roofing felt.
Then, the metal roofing panels arrived. Here they are, stored in what will eventually be bedrooms and part of the shop.

Now to get sixteen 30-foot panels onto the roof. Levers and pulleys would have helped---large mechanized equipment even more. As it was, we fortunately had the power of son Ian to help. Suffice it to say that it took a lot longer---and was far more painful---to get the panels onto the roof than it took to line them up and secure them. It was what you call a character-building experience. Screwing them down seemed easy after that.


The roofing came with these nifty foam inserts to plug up the peaks of the roofing panels.

The metal roofing hangs over the plywood substrate by a couple of inches. This is so gutters can be tucked under the sheathing, so that water will flow directly into them rather than down the fascia boards.

9/3/08

House Raising!


On Saturday, August 30, a wonderful and eclectic group of family, friends, coworkers, and acquaintances came together to help us raise the timber frame and rafters. What an amazing collection of knowledge, skill, sweat, and generosity!!! Here we have set rebar pins in the grade beam and drilled corresponding holes in the precut posts, and laid them out to be raised.
And as you can see, the house-raising crew took our plans and timbers---and raised the framework for a house!

8/26/08

The Rubble-Trench Foundation

Rubble-trench foundations were used extensively by architect Frank Lloyd Wright in the first half of the 20th century. They have fallen out of favor as concrete has become the norm and many code inspectors are unfamiliar with them. After finally deciding that a concrete slab was unacceptable to us in terms of meeting our project goals (because of extremely high embodied energy, high cost---and hard on feet and legs!), we decided that a rubble trench was time-tested and would provide a fairly simple, low-cost, environmentally friendly alternative. We also decided, after much deliberation, to use wooden grade beams (rot-resistant hemlock) on top of the trench, rather than concrete grade beams. We are betting the long-term soundness of these wooden grade beams on the steps we have taken to ensure that very little water ever touches the beams, that any moisture that comes in contact with them immediately drains away, and that, if for some strange reason water finds its way into the trench, it will not freeze before it drains away. A number of people have tried to persuade us to place a moisture barrier under the hemlock grade beams, but we feel that such a barrier would only serve to trap any moisture that found its way to the beams rather than allowing it to drain away. The following features of the foundation and house should keep the grade beams dry and sound:
> appropriately constructed trench dug all the way to ledge, with raised berm of washed stone and good bottom-of-the-trench drainage
> ground sloped away from the outside of the trench/house
> blueboard insulation angled over outside of trench and backfilled with washed stone
> a 2.5' roof overhang to keep water off the walls and grade beam
> a berm and a swale on the upslope side of the house to direct water away from house
(Excavating and filling the trench, and the graywater septic, is the only part of the construction for which we hired a professional contractor.)

8/25/08

Plan finalized

Our final plan is for a 43' X 25' (40' X 22' interior dimensions), rectilinear house. This is 880 square feet. Take away 176 sq ft for the shop and cold storage, and that leaves 704 sq ft of living space. Modest by today's standards: some would even say that dreaded word, "small" (people who have perhaps never heard of the Small House Society or read The Not So Big House). The skeleton is post and beam (using the methods outlined in Rob Roy's Timber Framing for the Rest of Us), which we will fill in with 18" cordwood infilling. Here is the final model for the post and beam framework. The high side faces south and will hold most of the glazing, and most of the living space. A central cordwood wall will provide thermal mass for the solar radiation thus gained. The low/north side is where the bedrooms and cool storage will be located.


8/24/08

House plan

Rob Roy's arguments about the maximum area of round structures make a lot of sense, and so our first house plan was round. Our second was 16-sided. After receiving foundation bids that nearly equaled our entire building budget, and realizing that a sixteen-sided roof would cost even more, we started over, working from these criteria:
> Simple enough for novices to build
> Passive solar
> Can incorporate standard-sized building materials
> Cheap enough to pay as we go
Most importantly, we reminded ourselves, the house is a means to an end---a different lifestyle---the house isn't the point. It's just a way to come up with a home that's easy/cheap to heat and power, is fairly "green" to build and healthful to live in, and easy/cheap enough to build to avoid debt.
The design elements flowed clearly and easily from these criteria. Our desire to take advantage of the sun and be able to use "off the shelf" building material meant that the house would have to be rectilinear. In order to be simple and cheap, it would also have to be single story. We decided upon a shed roof, since this is the simplest roof to build and lends itself to capturing southern sun. (Passive solar also meant that we couldn't tuck the house under the edge of the woods.) Here are our initial sketches for the resulting plans: